This tutorial explains how to make consistent AI characters, that will look the same in every image or video you generate with your AI tool. You will also be able to use multiple consistent AI characters in your scenes.
You will learn how to build a workflow, with multiple characters in videos, and compare generation costs before spending credits. All prompts are included.
What You’ll Learn
- How to make consistent characters with AI that look the same in every scene
- Create character sheets and save them as Elements for consistent image and video references.
- Use saved Element names with prompts to bring your characters into new scenes.
- Compare model quality against credit cost before choosing.
- Prompts Included.
AI Tools Platform Used
We used Higgsfield AI for this tutorial.
If you’re fed up with paying for separate AI tools, Higgsfield AI is worth a serious look. It brings image generation, video creation, audio tools, and ads studios into one platform, so you can handle more of your creative work in one place.
Watch the Video
You can watch the video first. Then i’ll break down, step by step, the process to make consistent AI characters.
Get Familiar With Higgsfield’s Core Tools
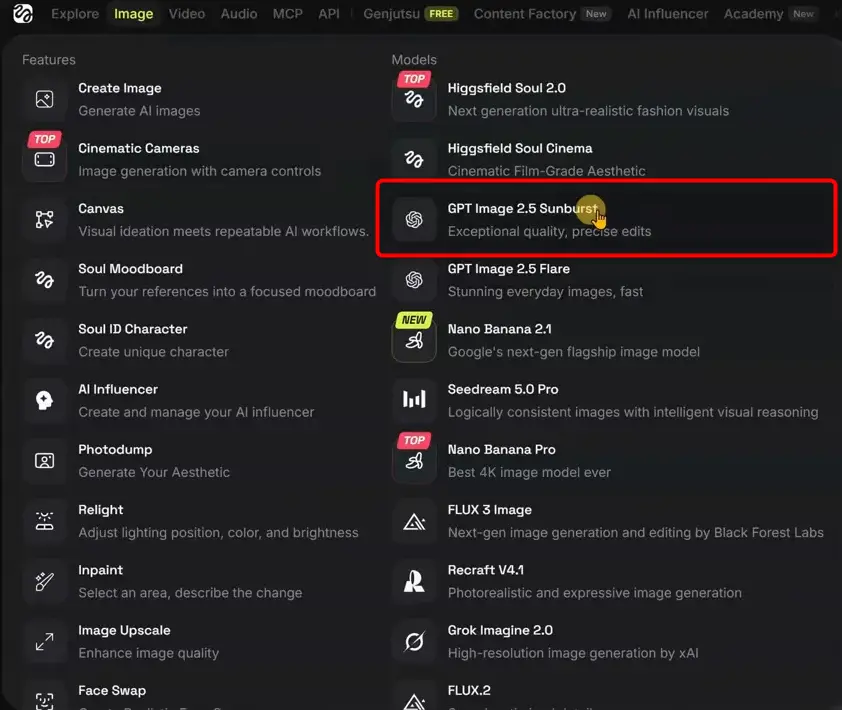
Higgsfield’s image menu gives you several model options, including Nano Banana Pro and the GPT Image options. For this character workflow, I’m using GPT Image 2.5 Sunburst.
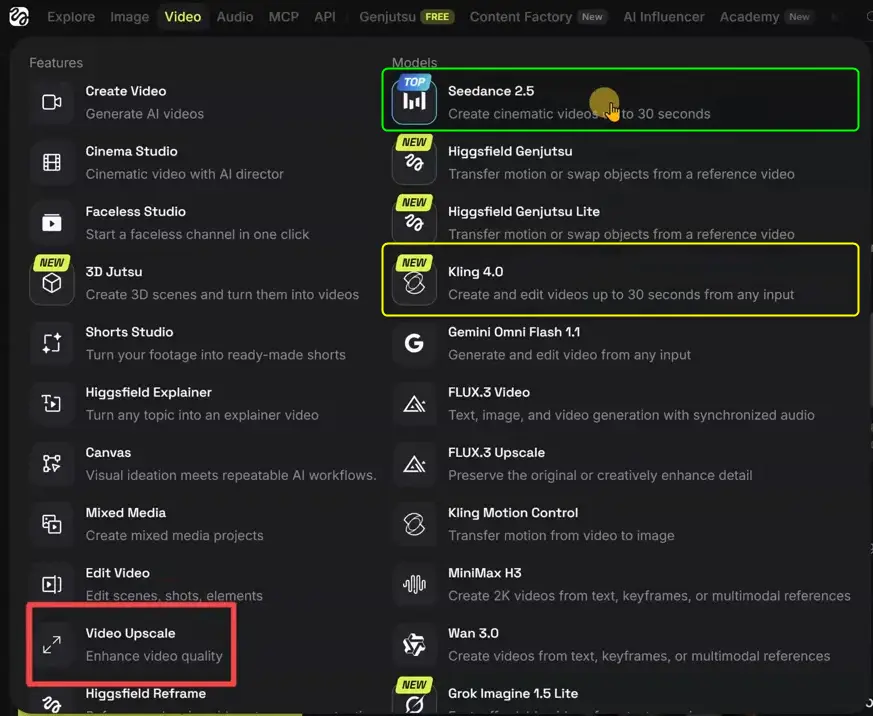
The video menu also brings multiple generators together. Seedance 2.5 is the model I use for most of my work. But I’ll test the new Kling 4, to compare credit costs.
Before generating anything, note two other useful parts of the platform:
- Video upscale: You can generate at a lower resolution and upscale later if needed, which can help save credits.
- Audio tools: The available options include names such as ElevenLabs, reducing the need for another separate subscription.
The main advantage is having these choices in the same workspace. You can build your image references, use them in a video project, and compare generators without moving between separate services.
How to Create Consistent AI Characters
Consistent AI Characters retain a recognizable appearance across different images, scenes, and actions. For this workflow, consistency starts by creating a character sheet.
The character sheet provides the visual reference, that Higgsfield can reference in future image and video generations.
1: Generate a Character Sheet
Open image creation and select your image model. I’m using the following setup:
- Model: GPT Image 2.5 Sunburst.
- Aspect ratio: 16:9 for a landscape image.
- Samples: Two, so there’s a choice between results.
- Other settings: Left unchanged, including the background setting, because the prompt handles the background.
If you’re creating vertical content for TikTok or Shorts, choose 9:16 instead.
Ask for a character sheet rather than a single scene.
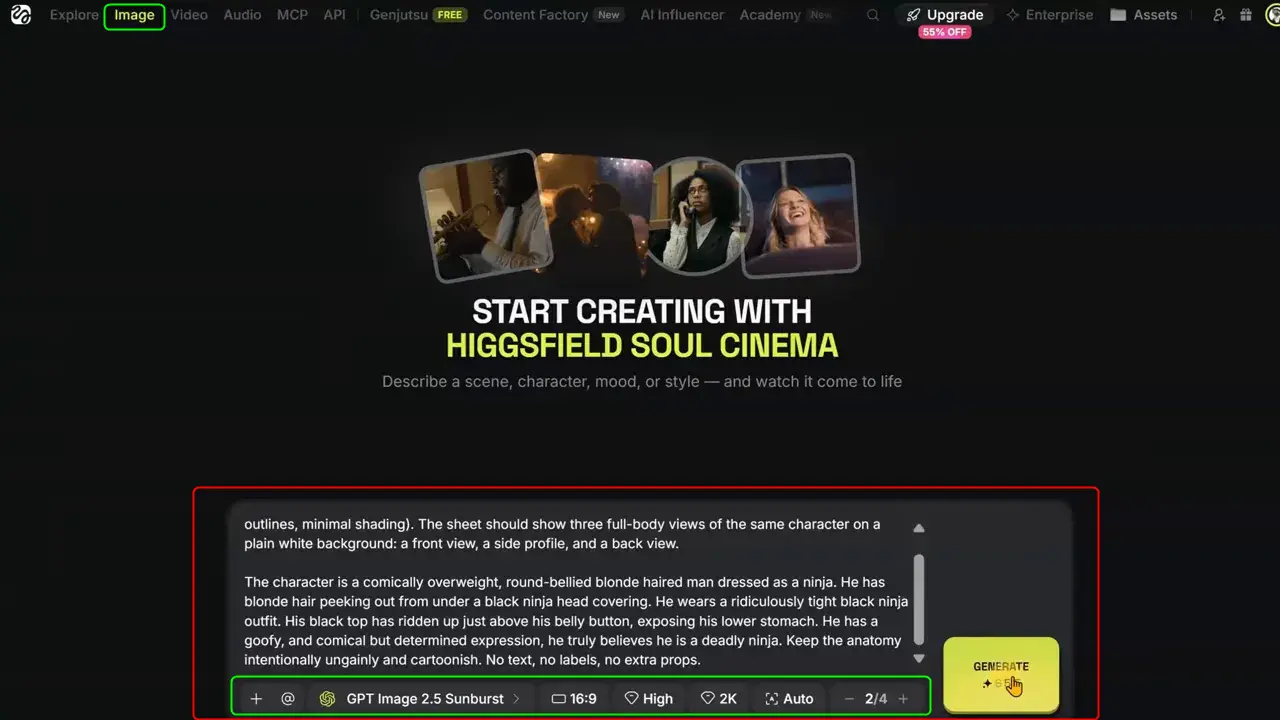
The prompt used for this image is shown below.
This is an adaptable example, not a required formula. Replace the description with your own character design.
Image Prompt
Create a 2D character sheet in a classic animated cartoon style (flat colors, thick clean black outlines, minimal shading).
The sheet should show three full-body views of the same character on a plain white background: a front view, a side profile, and a back view.
The character is a comically overweight, round-bellied blonde haired man dressed as a ninja. He has blonde hair peeking out from under a black ninja head covering. He wears a ridiculously tight black ninja outfit. His black top has ridden up just above his belly button, exposing his lower stomach. He has a goofy, and comical look, but he truly believes he is a deadly ninja. Keep the anatomy intentionally ungainly and cartoonish. No text, no labels, no extra props. 16:9 aspect ratio.
Generate the images and compare the options. I requested two samples.
In this example, the generated sheets show the cartoon ninja from the front, side, and back. Those different views give the AI a visual reference for the character’s appearance.
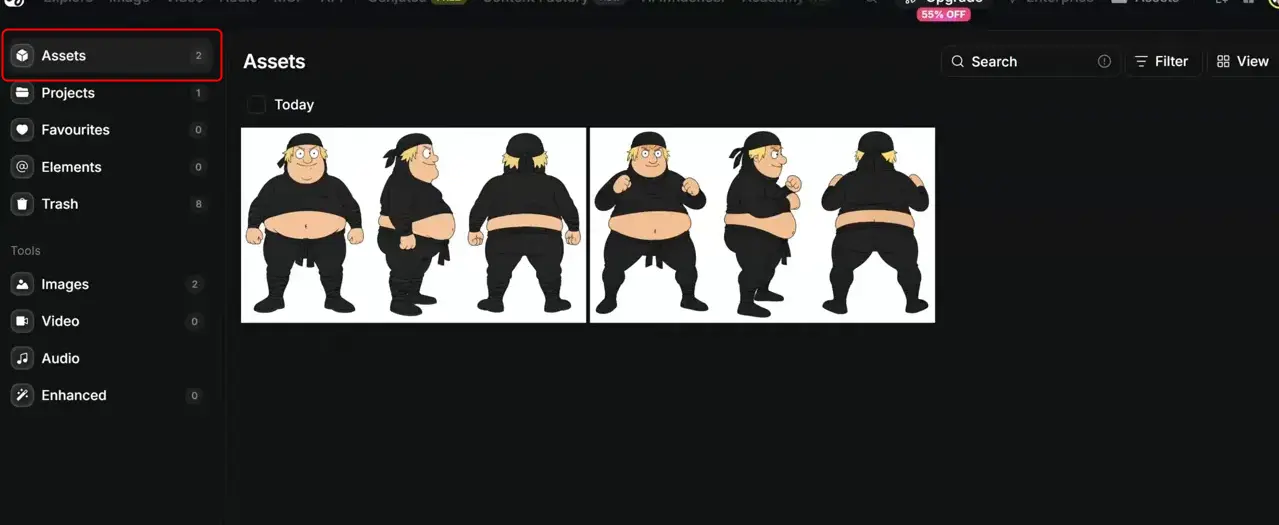
I choose the first. It was a close call. Choosing a design gives us a reference to carry forward.
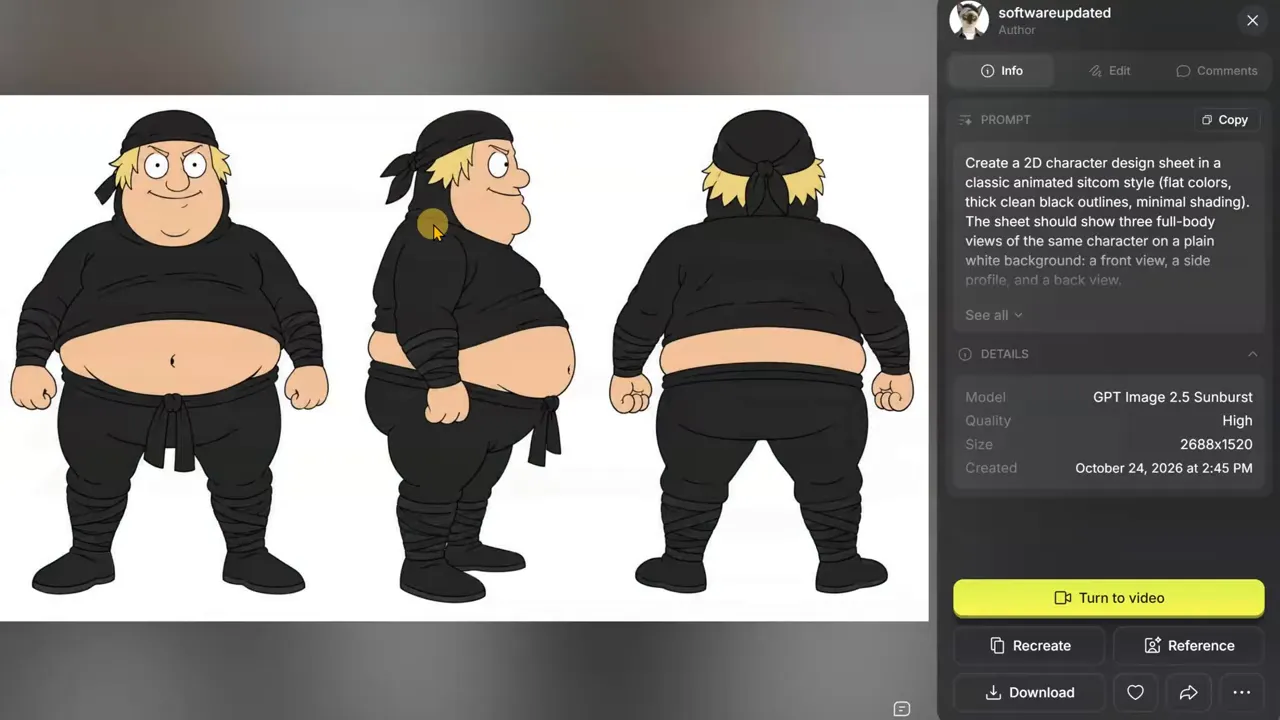
When selecting a sheet for Consistent AI Characters, check more than the appeal of the front-facing pose:
- Does each angle look like the same character?
- Are the outfit and accessories consistent?
- Do the body proportions remain recognizable?
- Is this a design you want to reuse across several scenes?
Repeat the same process for the second character, Sensei.
Image Prompt
Create a 2D character sheet in a classic animated cartoon style (flat colors, thick clean black outlines, minimal shading).
The sheet should show three full-body views of the same character on a plain white background: a front view, a side profile, and a back view.
The character is a middle-aged Japanese ninja master. He has a muscular, wiry build with a tall, disciplined silhouette. He has a neatly kept, short black hair typical of a traditional Japanese man, partially concealed under a simple black ninja head covering. He is clean-shaven with no facial hair.
He wears a traditional, loose-fitting black ninja costume and black ninja footwear. The outfit has clean, uncomplicated shapes.
His expression is stern, deadpan, and completely unimpressed. In the front view, his arms are crossed firmly over his chest. In the side and back views, he maintains a rigid, perfectly straight posture.
Keep the anatomy simple and cartoonish, emphasizing the contrast between his thin, serious frame and a comedic student. No text, no labels, no weapons, no extra props. 16:9 aspect ratio.
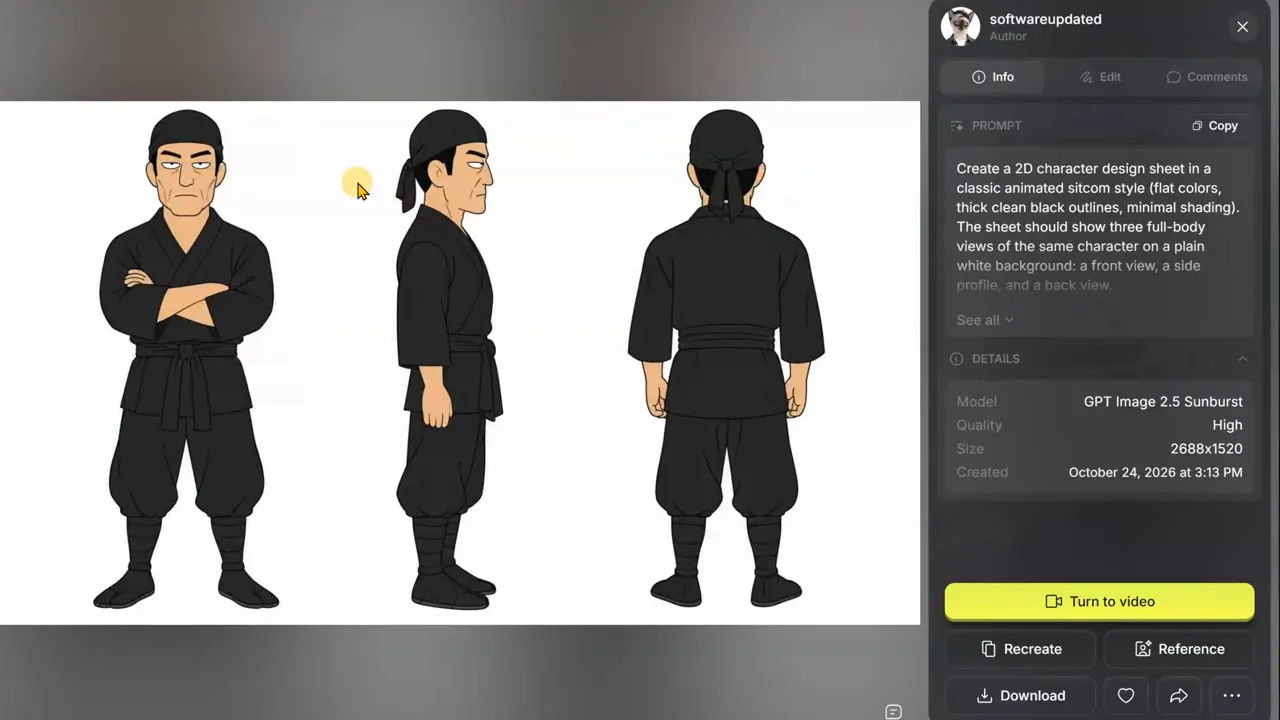
Where to Find Your Generated Assets
Your creations are available under Assets. You can also find them in the relevant media folders, such as Images or Video.
If you want to keep a local copy of a character sheet, select the image and use the download option.
2: Save Each Character Sheet as an Element
The key setup step for Consistent AI Characters is converting the selected sheet into an Element. An Element is a reusable reference that Higgsfield can call into a video/image generation through its assigned name. Elements can also represent objects or locations, not just characters.
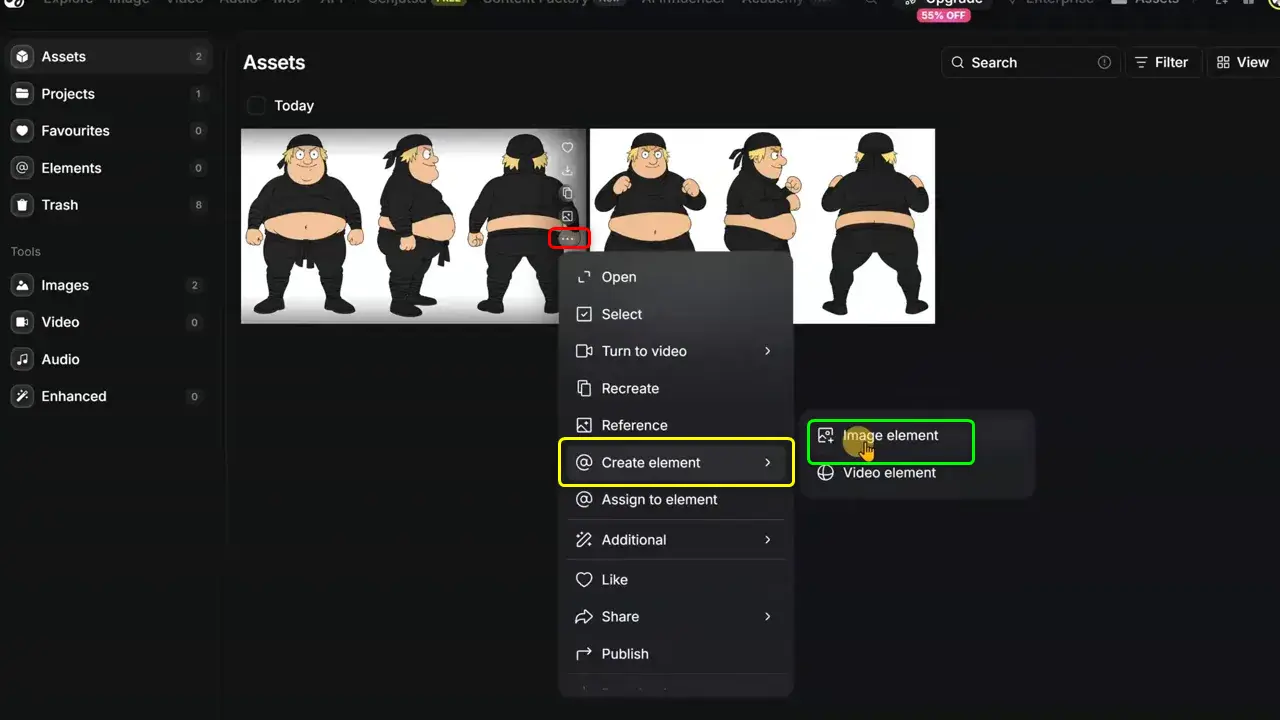
- Find the selected character sheet in Assets.
- Open its context menu and choose the option to create an Element.
- Enter a clear name, such as Chunky.
- Create the Element.
- Open the Elements folder and confirm that it appears.
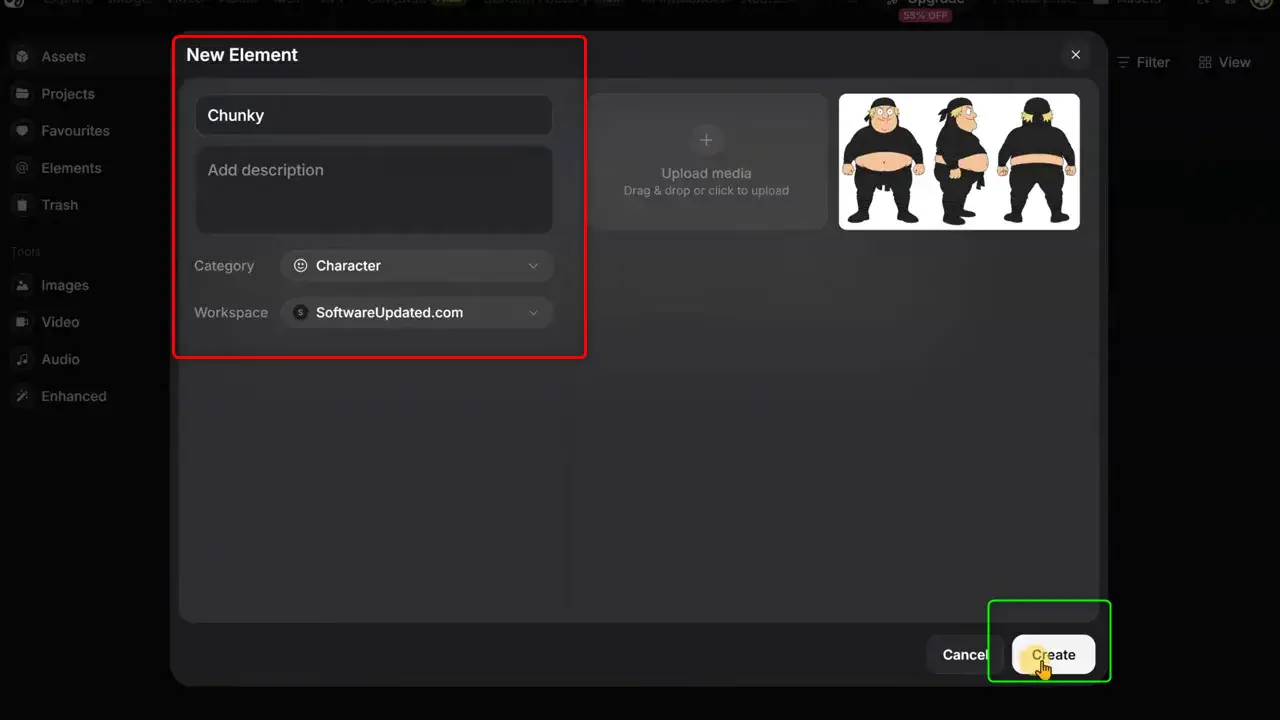
For Elements, Higgsfield assigns a reference label such as @Chunky.
Saving an image and creating an Element are different steps. The image remains an asset; the Element gives you the reusable reference label used in prompts. Confirm both characters are present before moving on to scene generation.
Open the Elements folder after saving. The character now has the label @Chunky. That is the reference name you’ll use in your prompts to bring this character into later generations.
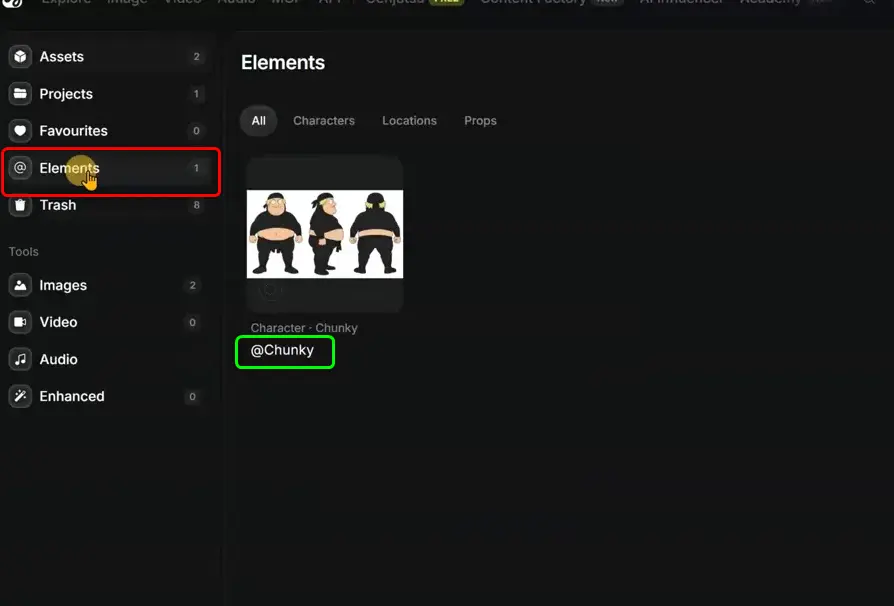
Repeat the same process for the second character, using a distinct name, in this case @Sensei.
An Element doesn’t have to be a character. It can also represent an object, a location, or another reusable reference.
Now both @Chunky and @Sensei are available in the Elements folder. The character setup is done, and we can move on to the fun part.
3: Write Prompts Using the Character Labels
To use Consistent AI Characters in a scene, include their Element labels in the prompt.
In the demonstrated Cinema Studio workflow, referencing @Chunky and @Sensei pulls their character sheets into the generation as references.
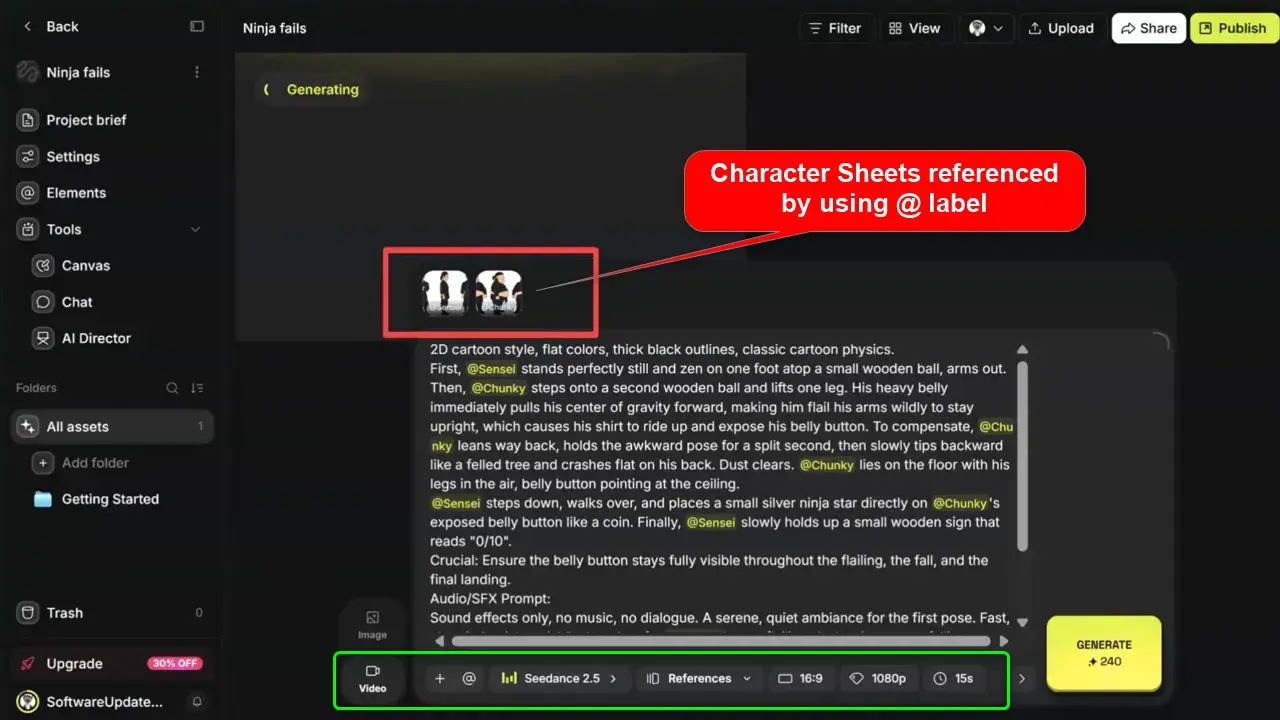
Use the Element Names in Your Prompt
The important part is referencing @Chunky and @Sensei in the video prompt. Those names pull in the saved character sheets as references. You’re not relying only on a fresh written description of each ninja every time.
Enter your scene prompt.
Use the labels to make each character’s role explicit. A practical prompt structure is:
- References: Which named Elements appear?
- Setting: Where does the action happen?
- Action: What does each character do?
- Ending: What is the final reaction or visual beat?
The prompt from the first video is below:
Video 1 Prompt
2D cartoon style, flat colors, thick black outlines, classic cartoon physics.
First, @Sensei stands perfectly still and zen on one foot atop a small wooden ball, arms out.
Then, @Chunky steps onto a second wooden ball and lifts one leg. His heavy belly immediately pulls his center of gravity forward, making him flail his arms wildly to stay upright, which causes his shirt to ride up and expose his belly button.
To compensate, @Chunky leans way back, holds the awkward pose for a split second, then slowly tips backward like a felled tree and crashes flat on his back. Dust clears. @Chunky lies on the floor with his belly button pointing at the ceiling.
@Sensei steps down, walks over, and slowly holds up a small wooden sign that reads “0/10”.
Crucial: Ensure the belly button stays fully visible throughout the flailing, the fall, and the final landing.
Audio/SFX Prompt:
Sound effects only, no music, no dialogue. A serene, quiet ambiance for the first pose. Fast, chaotic “swish-swish” whooshes for @Chunky’s arm flailing. A classic cartoon falling whistle as he tips backward, ending in a loud, heavy CRASH, followed by a brief moment of total silence. 16:9 aspect ratio.
The important distinction is between a ‘normal’ name in a prompt and a linked Element reference (@ prefix). For Consistent AI Characters, verify that the reference sheets appear in the prompt area rather than assuming that typing a character’s name is enough.
That’s the basic workflow: character sheet, saved Element, referenced video prompt. Once the sheets are saved, you can use those references again rather than starting the character design from scratch.
4: Generate the Video Scene
With your references and prompts are ready, open Cinema Studio and create a new project. Use a descriptive project name so related scenes are easy to identify later.
- Select Video mode.
- Choose the generation model.
- Set the resolution and duration.
- Enter the scene prompt with the Element labels.
- Confirm the reference thumbnails and credit total.
- Select Generate.
The example workflow uses Seedance 2.5 at 1080p for 15 seconds, with upscaling reserved for later if needed. Higgsfield also provides a video upscale option.
This approach keeps scene creation separate from the decision to upscale. First determine whether the generated scene is worth keeping; then decide whether it needs higher-resolution output.
Here are the video prompts for the other 2 videos.
Video 2 Prompt
2D cartoon style, flat colors, thick black outlines, classic cartoon physics.
First, @Sensei runs toward a flat wooden wall, runs two steps up it, does a clean backflip, and lands perfectly.
Then, @Chunky tries to do the same backflip but fails, landing flat on his back with a heavy thud, belly button pointing at the ceiling.
Finally, @Sensei slowly holds up a small wooden sign that reads “0/10”.
Crucial: Ensure @Chunky’s black top remains ridden up and his belly button stays fully visible during the slide and the final landing.
Audio/SFX Prompt:
Sound effects only, no music, no dialogue. Quick, light running footsteps and a soft “swoosh” for @Sensei’s flip. Heavy, clumsy running footsteps for @Chunky, followed by a loud “THUD” for the landing. 16:9 aspect ratio.
Video 3 Prompt
2D cartoon style, flat colors, thick black outlines, classic cartoon squash and stretch physics.
First, @Sensei drops from a low wooden branch and executes a perfect, silent superhero landing (one knee down, one fist on the ground, head held high). He then stands up smoothly and gives a slight nod.
Then, @Chunky jumps down and lands with a massive, ground-shaking, two-footed impact. The sheer force causes his large round belly to jiggle violently. The kinetic energy makes his tight black ninja shirt ride all the way up to his chest, fully exposing his bare belly and belly button. @Chunky is stuck in a deep, trembling squat, his legs shaking from the effort, with his belly button pointing directly at the camera.
Finally, @Sensei slowly holds up a small wooden sign that reads “0/10”.
Crucial: Ensure @Chunky’s black top remains ridden up and his belly button stays fully visible throughout the entire motion.
Audio/SFX Prompt:
Sound effects only, no music, no dialogue. A soft, silent “swoosh” for the first drop. A heavy, bass-boosted wooden THUD and floor creak for @Chunky’s landing. A comical, rubbery “wobble-wobble” spring sound synchronized perfectly with the violent belly jiggle. 16:9 aspect ratio.
Kling 4 vs. Seedance 2.5: Quality and Credit Cost
Having several video models in one platform is useful, but which one should you choose? To compare Kling 4 and Seedance 2.5, I used the same prompt and settings, including a 15-second duration.
The credit difference was substantial in this test:
- Kling 4: 15 credits for the selected 15-second generation.
- Seedance 2.5: 240 credits with the same settings.
That makes Seedance 16 times the credit cost of Kling for this comparison. These figures reflect the settings and costs shown during the test, rather than a fixed price for every generation.
For this test, I thought Seedance 2.5 produced the clearly better result. (See video).
But it also used 240 credits against Kling’s 15. That’s a large enough difference that quality cannot be the only consideration.
Kling is the much cheaper option in this particular comparison. Seedance is my preference for the finished result here. The important decision is whether that improvement is worth the extra credits for the clip you’re making.
Review whether the added cost produces a meaningful improvement in character appearance, action, and the intended ending. A lower-cost result may be sufficient for one scene, while another may justify a more expensive attempt.
Consistent AI Characters Checklist
Use this review checklist:
- Identity: Are both characters recognizable from their reference sheets?
- Design: Are the clothing, hairstyle, colors, and proportions preserved?
- Roles: Does each character perform the action assigned to them?
- Sequence: Does the scene reach the intended ending?
- Value: Is the result strong enough to keep, regenerate, or upscale?
Common mistakes to avoid
- Skipping Element creation: A character sheet in Assets is not the same as a named reusable Element.
- Omitting the @reference: Verify that the prompt attaches the intended character sheet.
- Changing several settings during a comparison: Keep the setup matched when evaluating models.
- Assuming references guarantee identical results: Elements support consistency, but each output still needs review.
- Overlooking asset organization: Use Assets for your creations and the relevant Images or Video folders to locate specific outputs.
You can also select an image asset to download it. Keep the chosen sheets easy to find so you can compare future scenes against the same designs.
Final Thoughts
The repeatable workflow for Consistent AI Characters is simple: create a character sheet, save it as an Element, attach that Element to each scene prompt.
The most useful beginner habit is to separate character design from scene generation. Build the reference Elements once, then reuse as often as you like.
That takes you from your first character image to a reusable AI video workflow. Ninja skills are optional. Chunky is certainly managing without them!
Disclosure: We are reader-supported, and this article may contain affiliate links.