If you want to produce polished videos fast, FlexClip AI Recreate is a powerful shortcut that lets you reproduce a template style using your own media and language. In this guide I walk you through every step of the process, share best practices, troubleshooting tips, and real use cases so you can get professional results with minimal effort.
Whether you need social posts, product promos, or training clips, FlexClip AI Recreate speeds up production and keeps style consistent.
Throughout this article I will explain the interface, show where to upload your files, and describe how to customize the generated video. I will also provide practical advice for picking templates, preparing assets, and finalizing export settings so the result looks like it was handcrafted—only much faster using FlexClip AI Recreate.
Why use FlexClip AI Recreate?
FlexClip AI Recreate solves a common problem: how to create multiple videos with the same visual identity without rebuilding each project from scratch.
The tool uses the style and structure of a chosen template and recreates a new video that matches that style while inserting your uploaded images, clips, and language.
Here are the main advantages:
- Speed: Generate a new video in minutes instead of hours.
- Consistency: Maintain the same look and structure across a series of videos.
- Language flexibility: Target different audiences by selecting the right language for each version.
- Customization: AI provides a first draft but you retain full control to refine text, music, layout, and more.
- Accessibility: Ideal for creators who want polished results without advanced editing skills.
Using FlexClip AI Recreate is especially useful for brands, educators, and social media managers who need a reliable, repeatable workflow.
The process retains the creative direction of the template while allowing your own content and messaging to shine.
Overview of the FlexClip AI Recreate workflow
The high-level workflow for FlexClip AI Recreate is simple:
- Open the template page and sign into your account.
- Choose the template you want to mimic and click AI recreate.
- Select the target language and upload your images and video clips.
- Click generate and wait while the AI creates the new video.
- Refine the generated video by editing text, music, layout, and timing.
- Export and download the final video.
The remainder of this guide breaks down each step and provides tips so you get the best output from FlexClip AI Recreate every time.
Step-by-step: Using FlexClip AI Recreate
Step 1: Open the template page and log in
Start by visiting the template page on the FlexClip site and signing into your account. Once you are logged in you can browse templates by category, or use the search bar to find a template that matches your goal—such as promotional, social, testimonial, or slideshow.
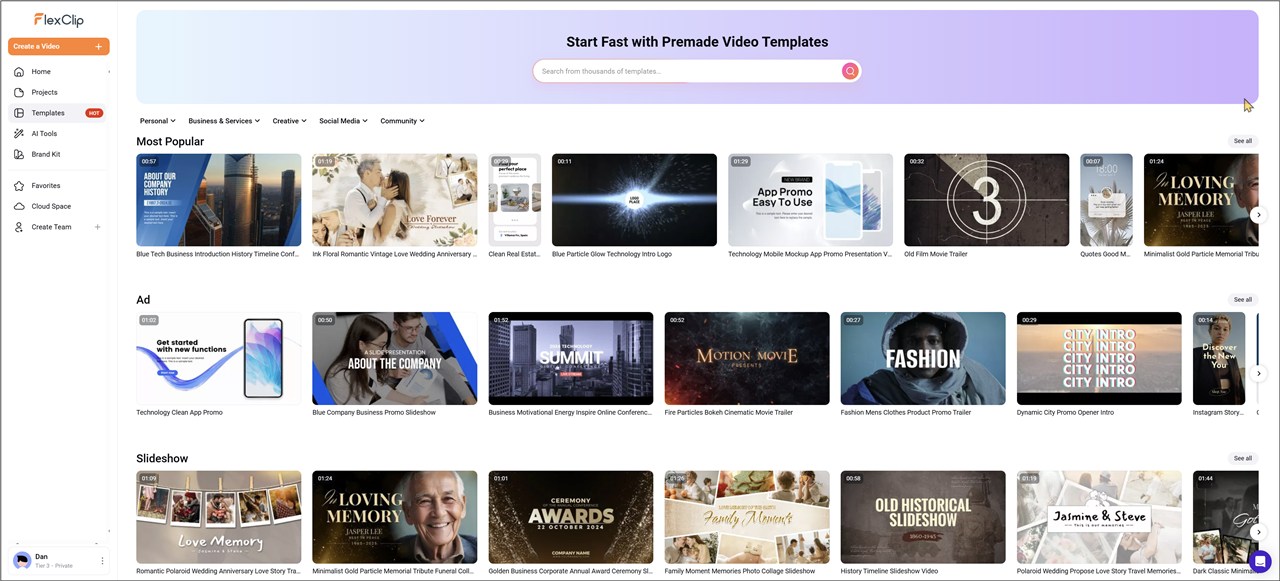
Choosing the right template is important: the template defines the pacing, transitions, typography, and overall mood that the AI will replicate.
- Search for keywords related to your content. If you are creating a product promo, search for “product” or “promo.”
- Preview templates to assess timing and structure. Pick templates with a layout that accommodates your footage and messaging.
- Match aspect ratio to your target platform (16:9 for YouTube, 9:16 for Instagram Reels, 1:1 for Instagram feed).
Step 2: Click AI recreate to start
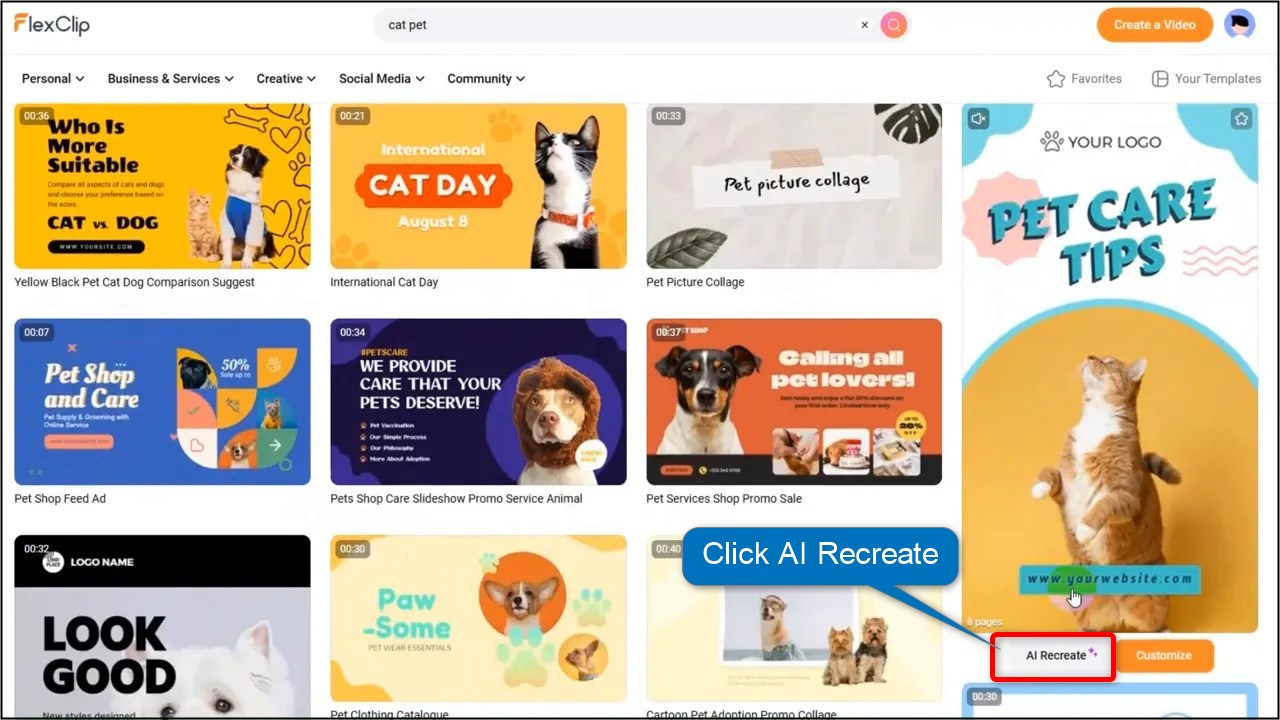
With your template selected, click the AI recreate button. This initiates the generation workflow. You will be taken to a new page that shows a preview of the template—usually on the left side of the screen. The preview helps you confirm you chose the right template and gives an idea of how the final video will be structured.
At this stage the tool prepares to accept your media and language choices. Think of AI recreate as a smart copy-and-paste: it copies the style and structure, then pastes your content into that framework.
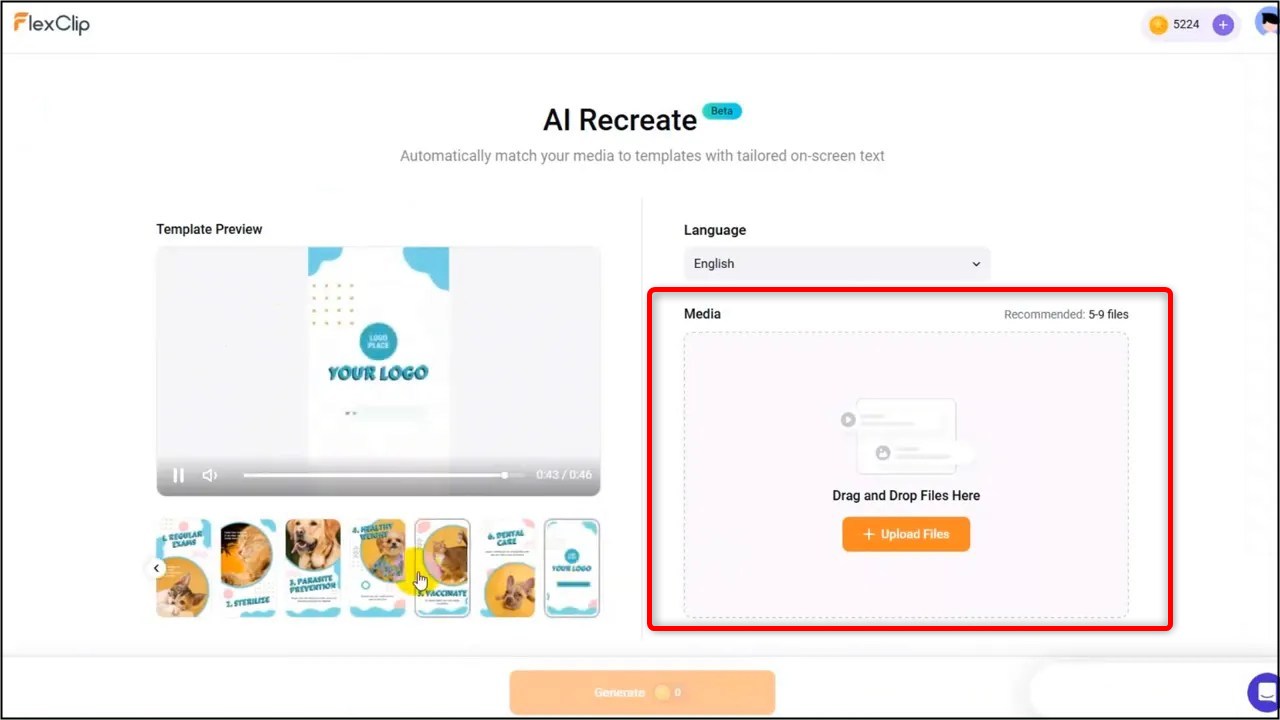
Step 3: Select a target language and upload your images and videos
The next screen prompts you to select a target language and upload the assets you want the AI to use. Choosing the correct language ensures that on-screen text and suggestions match the audience you are targeting.
Upload your images and video clips according to the template suggestions so the AI can place them accurately.
- File types: Use common formats like JPEG, PNG, MP4, MOV.
- Resolution: Higher resolution images and videos yield better results; follow the template’s suggested aspect ratio.
- Number of assets: Upload as many as the template suggests. Templates often expect a set number of images or clips for scene placeholders.
- Order matters: If the template has defined scene order, consider uploading assets in the sequence you want them placed.

Tips for preparing assets before upload:
- Crop or resize images to match the template aspect ratio to avoid unexpected crops.
- Trim long video clips to the most relevant segment; the AI will slot them into short scenes.
- Label files meaningfully so you can quickly identify which asset the AI used in each scene when reviewing the draft.
Step 4: Click generate and wait
After you upload assets and confirm language, click generate. The tool will use AI to assemble a new video that mirrors the template style but uses your media and language settings. Generation typically takes a few minutes depending on server load and the size of your assets.

While waiting, consider what you will customize after generation. Common post-generation edits include text tweaks, music swaps, and timing adjustments. Plan to spend a few extra minutes polishing the AI’s draft to reach professional quality.
Step 5: Review and customize the generated video
When FlexClip AI Recreate finishes, you will see a generated video that follows the template’s design. The AI automatically adjusts on-screen text based on the media you uploaded, but it is common and encouraged to refine the text, music, layout, and timing to match your brand voice.

Customizations to consider:
- Text: Edit headlines and captions to better reflect your message and tone. AI provides a starting point, not the final word.
- Music: Swap stock music for a track that matches energy and pacing. Remember music rights if you plan to publish broadly.
- Layout: Adjust scene layouts where text or imagery gets cut off. Move elements, change sizes, or swap templates if needed.
- Timing: Fine tune scene durations so each image or clip gets the right amount of screen time for the message to land.
- Transitions and effects: Modify transitions for smoother flow when your clips differ from the template’s original material.
- Subtitles and captions: Add or correct subtitles; this improves accessibility and performance on social platforms where sound is often off.
When editing, follow these practical tips:
- Read every piece of AI-generated text. Replace filler or generic phrases with concise calls to action.
- Check visual alignment across scenes to avoid awkward cropping on faces or product shots.
- Match music beats to scene cuts for a professional feel. Use the timeline to nudge cuts to the beat.
- Preview in the target aspect ratio. A scene that looks fine in 16:9 may not translate well to 9:16.
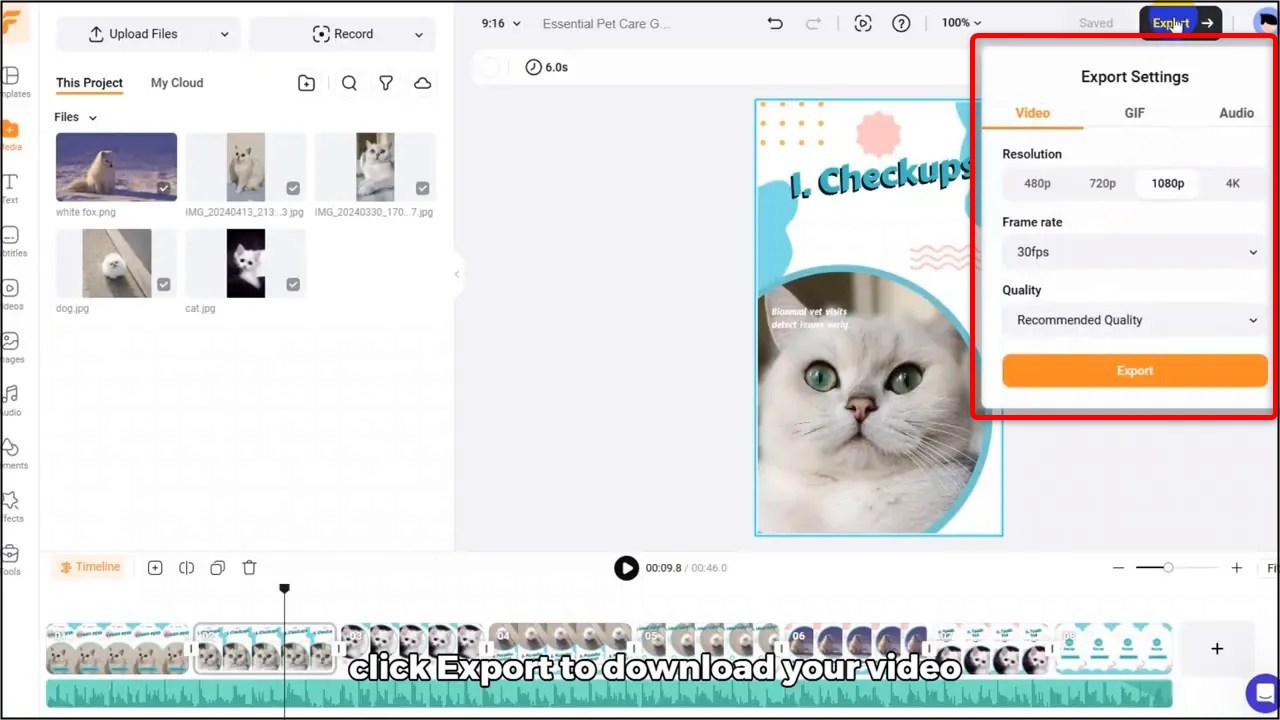
Step 6: Export and download your completed video
Once you are happy with edits, click export to download the final video. Choose the resolution and format appropriate for your distribution channel. Note that export options may vary by plan, so verify your account capabilities if you need 1080p or 4K output without watermarks.
Before exporting, run a final checklist to avoid rework after publishing:
- Spelling and grammar check on all on-screen text.
- Audio levels consistent across music, voiceover, and sound effects.
- Proper aspect ratio and resolution for each platform.
- Final review in full-screen mode to catch visual artifacts.
- Confirm music licensing or swap to royalty-free tracks.
- Brand elements such as logo, colors, and fonts applied.
- Scene timing optimized for message clarity.
- Subtitles added and verified.
- Final export tested on desktop and mobile displays.
Practical tips to get better results with FlexClip AI Recreate
To make the most of FlexClip AI Recreate, apply these practical methods:
- Pick templates that match content structure. If you have a lot of product shots, choose a product showcase template. For testimonials, pick templates with text-first layouts.
- Prepare a concise script. Even if the AI adjusts text, providing a short script or key phrases in your uploads helps the AI match tone and intent.
- Optimize assets. Use high-quality images and short video clips. Avoid extremely long clips that need heavy trimming.
- Consistent branding. Use your brand fonts, colors, and logo. If FlexClip allows brand kit imports, add those assets first so generated text and elements default to your brand.
- Use placeholders thoughtfully. If the template has a specific scene for testimonial quotes or logos, ensure you upload assets that suit those placeholders.
- Localize properly. When using the language selector, review all generated text for cultural appropriateness, spelling variations, and idiomatic accuracy.
- Be iterative. Generate multiple versions when testing different messages or calls to action. Small text changes can dramatically affect engagement.
These tips help increase the odds that FlexClip AI Recreate will produce a strong first draft that requires minimal editing.
Use cases and examples for FlexClip AI Recreate
FlexClip AI Recreate fits a wide range of production needs. Below are practical examples and short workflows for each use case.
Use case: Social media ads
- Choose a high-energy ad template.
- Upload short product clips and lifestyle images.
- Select the target platform aspect ratio and language.
- Generate and tighten timing to fit 15 or 30-second ad lengths.
- Customize CTA text and add tracking links in the post, not the video.
Use case: Product demo
- Pick a template with clear product-focused scenes and text overlays.
- Upload screen recordings or product footage and concise bullet points for features.
- Use subtitles and highlight key specs on-screen for clarity.
Use case: Event recap
- Select a dynamic montage template that supports multiple clips.
- Upload event shots and short testimonials.
- Use ambient music and quick cuts to match the event energy.
Use case: Training or explainer videos
- Pick templates that include clear text and step-based layouts.
- Upload voiceover clips and supporting graphics for diagrams.
- Add chapter markers and use subtitles for accessibility.
FlexClip AI Recreate enables these workflows by applying a consistent template structure across each final video, saving time when producing multiple iterations.
Conclusion
FlexClip AI Recreate is a fast, effective way to produce consistent, on-brand videos with minimal manual editing. By choosing the right template, preparing assets correctly, and refining the AI-generated draft, you can create high-quality videos for a variety of use cases. Use the step-by-step process in this guide as a checklist to optimize your workflow and reduce production time.
To recap: log into the template page, click AI recreate, select a target language and upload your media, click generate, customize the output, and export when you are satisfied. With practice you will streamline the route from concept to final export using FlexClip AI Recreate.
Start experimenting with different templates, languages, and asset combinations to discover which setups work best for your content strategy. The more you use FlexClip AI Recreate, the faster you will get comfortable producing professional results at scale.
Happy creating with FlexClip AI Recreate.
See Also:
FlexClip Auto Edit: How to Create Videos Faster with AI
FlexClip Review
Disclosure: We are reader-supported, and this article may contain affiliate links.